Installation Instructions

Congratulations! you have selected the best brake cylinders available, regardless of price.
Made in the USA from new stainless steel components, these cylinders will provide you uninterrupted
service for as long as you own your car... guaranteed! (steel parts only)
Installation:
The most common problems related to installation are as follows:
- Pads not completely engaged in the piston slot.
- Pads too tight in the caliper's slot. This is caused by dirt and rust which must be
removed.
- Squealing brakes.
- Deteriorating rubber components.
The first two problems described result in the pads "sticking" in the caliper slot. If this happens, the pad
will not retract and will drag against the disc when the brake pedal is released.
We recommend using new, good quality, pads coated with anti-squeak compound and completely
engaging them in the piston slot before installing the cylinder in the caliper. Finally, we prefer
that you use glycol fluid in order to assure maximum life from the internal rubber components.
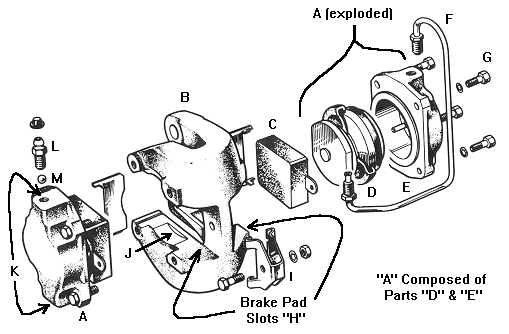
Notes: See enclosed figure 1 for reference during
installation/removal.
We recommend the use of new brake pads when replacing the brake
cylinders.
We recommend caliper (B) removal for best results.
STEPS FOR BRAKE CYLINDER INSTALLATION/REMOVAL
- Carefully disconnect the cars brake line from the existing brake cylinder (A).
- Remove the 2 caliper (B) attachment bolts (not shown) and remove the caliper assembly.
- Carefully loosen the bridge pipe (F) fittings and remove the bridge pipe.
- Remove the pad support plate (I) by removing its retaining bolt.
Repeat Steps 5 & 6 For Each Brake Cylinder
- Remove the four brake cylinder (A) attachment bolts (G).
- Carefully loosen the brake pad (C) by cleaning rust and debris from in-between the brake pad and
the caliper slot (H) in order to remove the brake cylinders without damaging the brake pads
(important only if the brake pads are to be re-used). Carefully slide the brake pads off of the piston
(D) and set aside for re-use upon assembly (if appropriate).
- Complete the rust and debris removal begun in step 6 and then flat file the brake pad slots (H) in
order to guarantee free, unimpeded motion of the brake pads (C) in the brake pad slots.
- Clean the four brake cylinder piston clearance grooves (J) as best possible to allow free movement
of the installed brake cylinder pistons (D).
Repeat Steps 9 - 12 For Each Brake Cylinder
- Position the brake cylinder piston (D) so that the "flat spots" are perpendicular to the brake
line/bleeder hose attachment holes (K). This positioning is reflected on the piston (D)/Housing (E)
portion of figure 1.
- Slide the brake pad (C) onto the brake cylinder piston (D) so that the "tab" is facing in the same
direction as one of the "flat spots" on the piston.
- Grasp the assembled brake cylinder so that your fingers support the bottom edge of the cylinder
housing and your thumb holds the brake pad "tab" in the previously mentioned position.
- Slide the brake pad into the caliper brake pad slot and then slide the assembly as necessary to
align the brake cylinder attachment bolt holes. Insert and tighten the four attachment bolts.
- Reinstall the pad support plate (I).
- Reinstall the bridge pipe (F) as shown in figure 1 (we recommend replacement with Hye-Dra-Cyl Part # 316BPR/316BPL).
- Remove the original bleeder valve (L) and check ball (M) and reinstall on the new caliper
assembly (we recommend replacement with Hye-Dra-Cyl Part # 3824BV).
- Reattach the caliper assembly to the car with the two attachment bolts removed earlier.
- Reconnect the cars brake line to the caliper assembly.
- After completing steps 1 through 17 for each wheel to be repaired, bleed the brakes as explained
in your service manual.
Questions or comments can be referred to us at the following address:
Hye-Dra-Cyl L.L.C.
804 Woolwick Ct.
St. Charles, MO 63304
(314) 303-6705 (Phone)
(636) 922-0711 (FAX)
or: ghagopia@mail.win.org
Thank You for purchasing Hye-Dra-Cyl brake cylinders and happy
motoring!


